Introduction
After receiving multiple phone calls from what our caller ID reported as the rich and famous only to find out it was our own Alex Sanders on the other end, he is here to demonstrate the process associated with the tech and process used to do so.
When it comes to social engineering, voice phishing can make or break the engagement. A lot of people are trained to deal with suspicious emails and documents, very few have meaningful training on suspicious calls. In this article we’re going to walk through the process of setting up self-hosted tooling to perform these calls.
Before getting started, it’s important that you, the social engineer, think about what your ruse or pretext, along with the desired premise and outcome. Does your ruse require you to spoof a phone number? Do you only need the area code to originate from a location aligned with the target person or organization? If you want to save on costs and can get away with just a matching area code, a service like TextNow would suffice. Download the app, sign up with any email, deny location permissions, enter the area code you’re matching, and choose a number.
If you need to spoof the entire phone number, you essentially have two options: services like SpoofCard or your own Private Branch Exchange (PBX). Spoofcard works well enough, but if you want to have reliable control over your services and an understanding of what’s happening behind the scenes, you should stand up your own PBX. So what is a PBX? To answer that, we need to understand a little about Voice over IP (VoIP), in general.
VoIP Overview
Back, many years prior to the EV revolution of current day, phone calls were placed over somewhat "closed" networks and protocols. This network, similar to how we think of the Internet, was referred to as the Public Switched Telephone Network (PSTN). How did someone or something (e.g., analog modem) interface with the PSTN. Via Earthlink or America Online, of course! Albeit, there is some truth in that, the PSTN was accessed through PBXes that resided within a Central Office (CO). A CO was literally a collection of necessary equipment, which contained the PBX, switches, and all the rest of the goods housed within a large building in all major cities.
As you can probably ascertain, this was costly to maintain and copper "land lines" were geographically limited as compared to our modern expectations of liberated communications. With that, just as we put radio on the Internet, we did so with voice phone calls, as well.
VoIP is a protocol stack that permits placing phone calls over Internet (i.e., IP) based medium. VoIP can communicate directly and natively over IP with other VoIP devices, and interact with phone exchanges via the PSTN. The latter, use of the PSTN, is typically still a fundamental necessity when dialing by phone-number, for example. Additionally, VoIP devices and analog telephony devices can coexist through Analog-to-Digital | Digital-to-Analog converters (i.e. ATA). All of this interaction still leverages a PBX as the gatekeeper, of sorts.
Typical VoIP communication is comprised of two parts, 1. SIP (Session Initiation Protocol) and 2. RTP (Real Time Protocol). SIP establishes and manages the connection (i.e., call setup and teardown) while RTP delivers the payload (e.g., audio signals). The architecture for the infrastructure involved typically goes as follows – a DID (Direct Inward Dialing) number is registered via a SIP trunk provider, the technician then configures a phone to register to a PBX (Private Branch Exchange) server and dial out through this DID number at the provider. So what is the SIP Provider, you might ask? There is still a requirement to be able to access the PSTN, as we described earlier, and the SIP Provider maintains their own litany of PBX devices that knows how to interface with the telecommunication conglomerate's closed PSTN. Anyway, enough of the history lesson, let's get our hands dirty with some tech...
Preparing the PBX and Choosing a SIP Provider
Now that we’ve had an overview on how these systems work in theory, let’s set up our self-hosted PBX. You’ll want to download a copy of Debian 11 and install the following packages: wget tar vim jq.
From here, ensure your terminal window is fullscreen, or the next script will fail to set up asterisk. Use wget to download the IncrediblePBX2027-D.sh script that does most of the heavy lifting for us. Make sure to apply execute permissions, chmod +x <script>, to the script and then run it as root. This will set up all the necessary packages and configure them to play nicely, as well as create several additional scripts in the root home directory for management of the server.
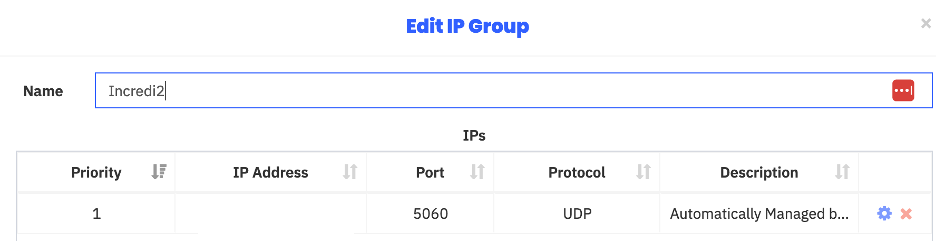
Once this has finished, run the admin-pw-change and apache-pw-change scripts from the root home directory. At this point, we’ll need to register with Skyetel (i.e., the SIP Provider) and purchase a DID phone number. Once this is done, configure an IP Group to allow communication to their servers. This can be done manually, but we’ve used another script to automate this. Execute the script and follow the prompts.
Configure the PBX and Soft-Phone Handset
Now that our public IP is allowed to communicate with Skyetel’s servers, we need to manage our PBX and phone system. There are four (4) main components we need to concern ourselves with:
- Extensions – internal identification of phones
- IP addressing
- SIP Trunks – what servers our VoIP traffic communicates with and how to communicate with them
- Outbound Routes – which trunks are in use, and Dial Patterns – how the PBX parses dialed numbers
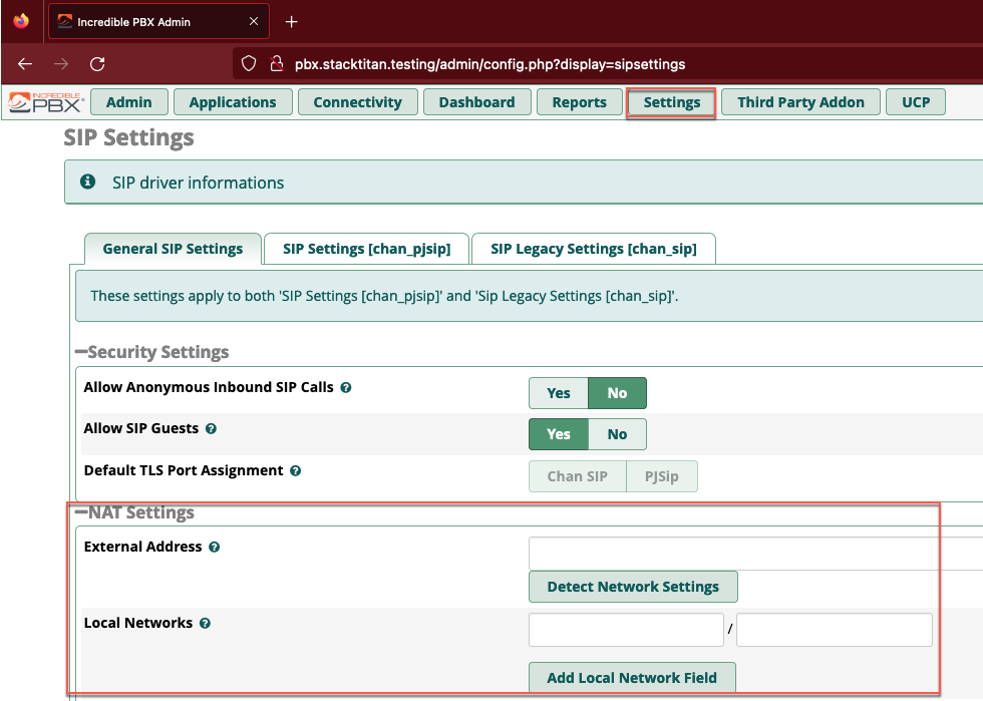
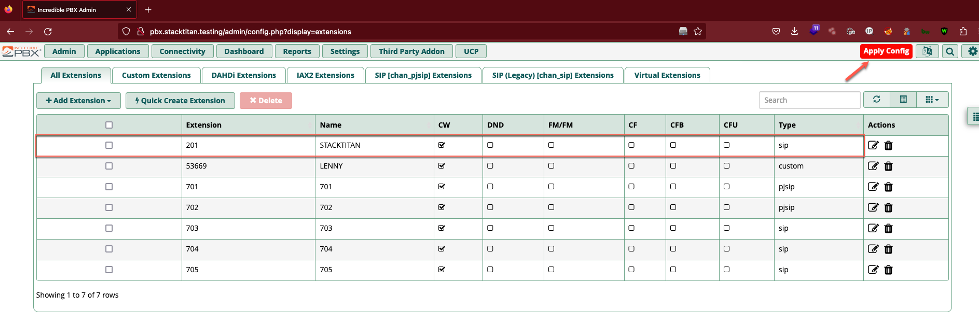
For all changes in Incredible PBX, you must use the Submit button on the bottom right and apply changes using the red Apply Config button in the top right. First we’ll navigate to Settings > Advanced SIP Settings and use the Detect Network Settings button to auto-populate our LAN and WAN details.
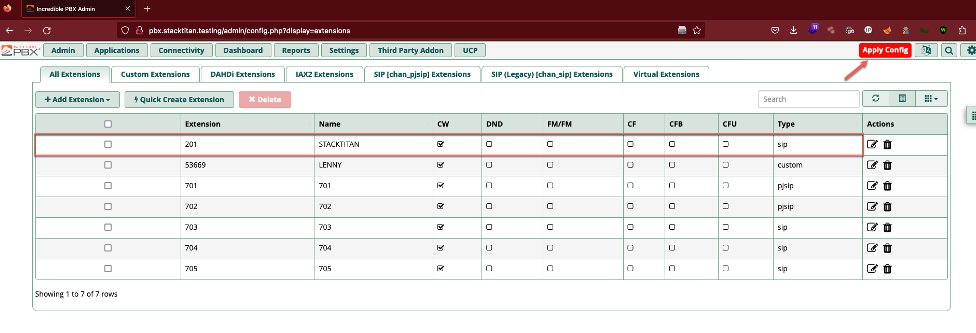
Next we’ll create a SIP extension so that a local endpoint (e.g., SIP enabled phone handset) can communicate with the PBX using traditional SIP over TCP 5060 (note that TLS enabled SIP is typically TCP 5061). These extensions are unique to each endpoint, such as each employee often has their own desk phone and number.
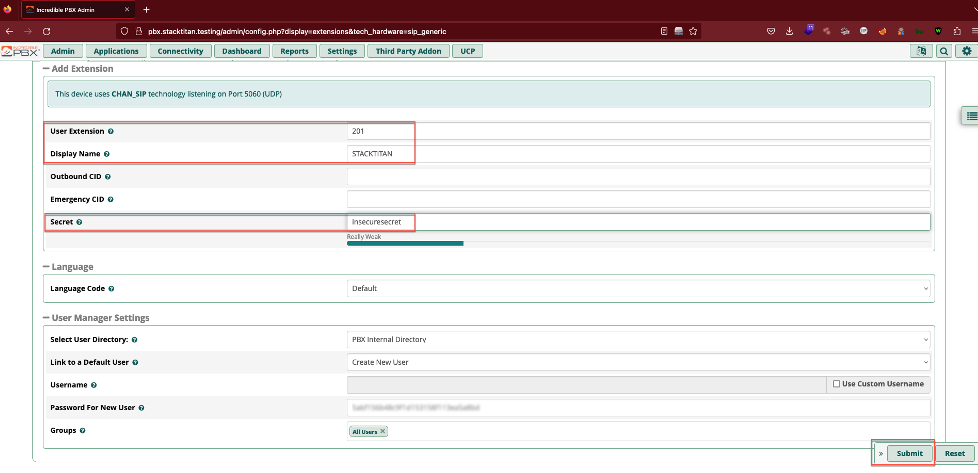
Navigate to Applications > Extensions, click the Add Extensions drop down, and select +Add New SIP (Legacy0 [chan_sip] Extension. Fill out the User Extension, Display Name, and Secret fields. A secret here should be treated similar to a password. It needs to be composed with enough length and complexity to prevent compromise of the extension. As an aside, this sort of attack is often referred to as registration hijacking, and we wrote some code a while back as a proof-of-concept, if interested in exploring further.
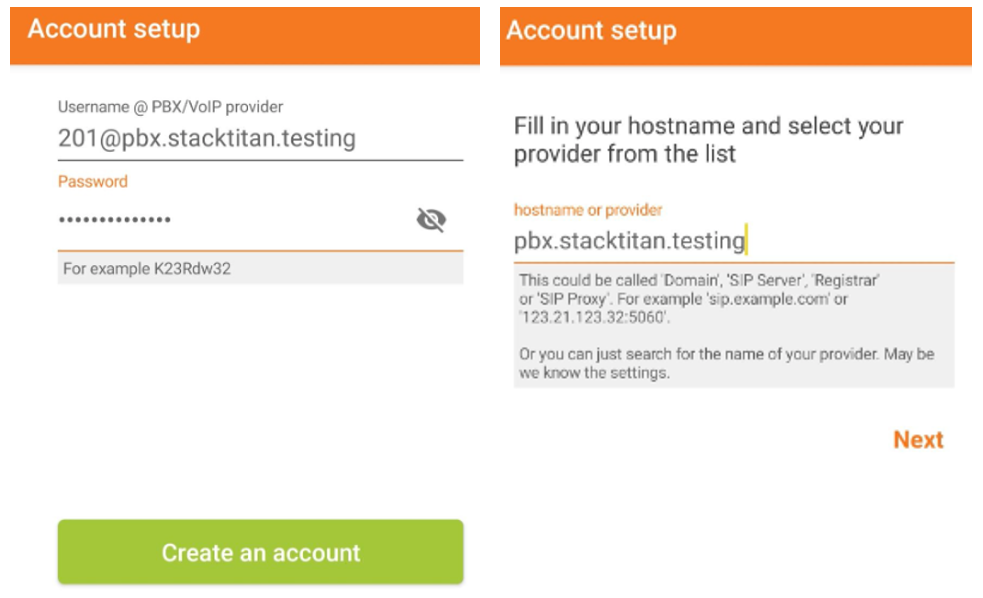
With an extension configured, we need to set up an actual phone. We had mentioned desk phones, but many organizations have moved to software based phones (soft-phones). Soft-phones are arguably more feature rich, and many are integrated into operating systems or cloud subscriptions, already. If not, numerous open-source soft-phones are available, which provide everything necessary to gey up and running. With that said, we are going to configure the Zoiper soft-phone. Jumping right in, the username field should be the extension you configured @ the hostname or IP of the PBX instance. The password field will be the secret you configured for the extension, hostname will be the hostname or IP of the PBX.
As long as this doesn’t fail to register, we’ll move on to configuring the outbound route for the PBX to communicate with Skyetel. Otherwise, if you’ve chosen another provider, you will need to configure trunks and a dial plan for that provider as Incredible PBX 2027 is already set up to work with Skyetel.
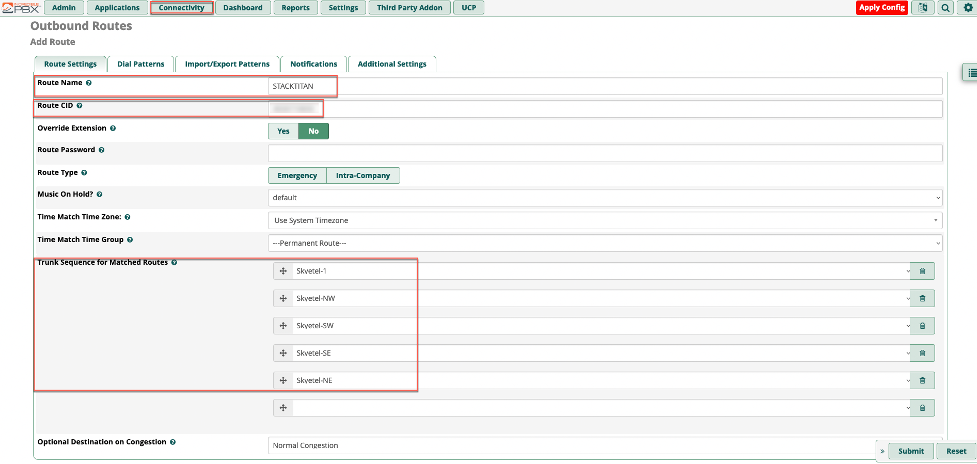
Navigate to Connectivity > Outbound Routes > Add Outbound Route. Fill in the values for Route Name and Route CID (this is the phone number you’ve purchased through Skyetel). The Trunk Sequence for Matched Routes will be the trunks that are pre-configured for Skyetel.
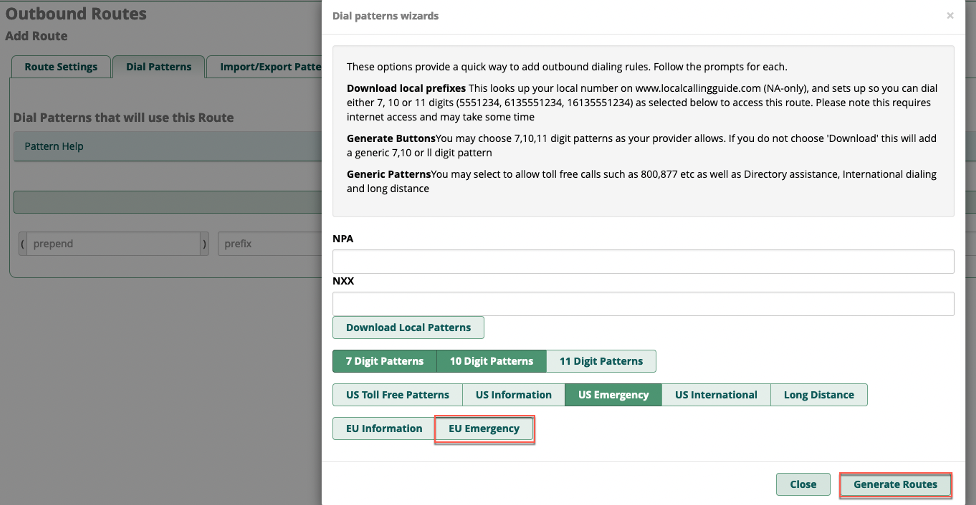
Next we’ll navigate to the Dial Patterns tab and use the Dial patterns wizards button to make sure our calls will complete as dialed. De-select the EU Emergency option, and leave the other default selections in place. Click the Generate Routes button, then submit and apply the config.
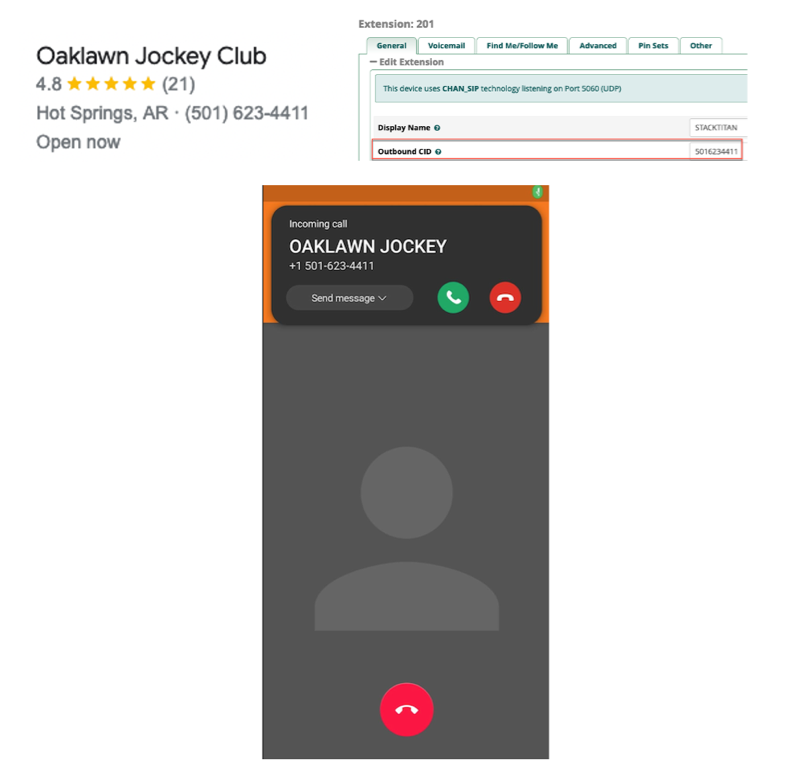
With all of this configured, we can place a call from Zoiper to verify that everything works as intended. Once we have a regular call working, we can fill in the Outbound CID under the Extensions configuration with the number we intend to spoof and test that. Voila, here I am making a call to myself as the local casino...which has informed me that I have already lost at Texas hold-em! Better luck in Vegas.
Conclusion
We hope that you found this useful and has inspired you to explore VoIP technologies. Although, voice phishing may not be everyone’s favorite social engineering vector, it can be effective with the right tools and planning. With a little additional configuration, this could even be used as part of a regular email phishing campaign: supply a phone number for users to call at the bottom of the email to verify the legitimacy of an email, get in touch with support over an invoice, or whatever ruse you can come up with. Have fun, spoof responsibly, and until next time.