Ahhh...Capture the Flag (CTF), and who doesn't like a formidable challenge? Security conferences are great and all, but it is always more fun to spend time with our team at STACKTITAN hacking on various CTF challenges. That is exactly what we recently did at Kernelcon 24.
The CTF ran through the con and was the typical jeopardy style with various categories and weighted challenges by difficulty. Solve the challenge, get the flag and post to the leaderboard. There was also a nice balance of challenges ranging from web application, mobile, hardware to reversing. The team was busy with presenting, so we didn't have a constant focus on the CTF but still ranked within the top 10. Not too bad.
The Android Challenge
Out of the many challenges, I tend to enjoy those about reversing and mobile applications. One such challenge, was The Terminator mobile application that said something to the likes of "Attack the terminator before your time runs out and the clock resets". It seemed interesting enough so here is the writeup about how I solved the challenge and beat the Governator.
The Terminator Android Application
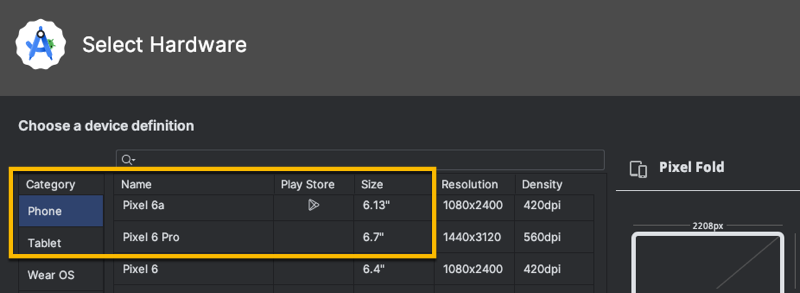
First thing is to get a working environment to load the Android application (i.e., APK), so we load up Android Studio and the Virtual Device Manager. I am running a Pixel 6 Pro with API 30. When launching the image it will use Qemu as the emulator environment. Side note, not that it matters in this situation, but images with the Play Store enabled are non-rooted and images without the Play Store provide root access, which would look something like this:
Anyway, the APK is actually named GPTerminator.apk and can simply be dragged onto the running emulator's view, which will install it automagically (err...using ADB as the actual method). Viola...we get this.
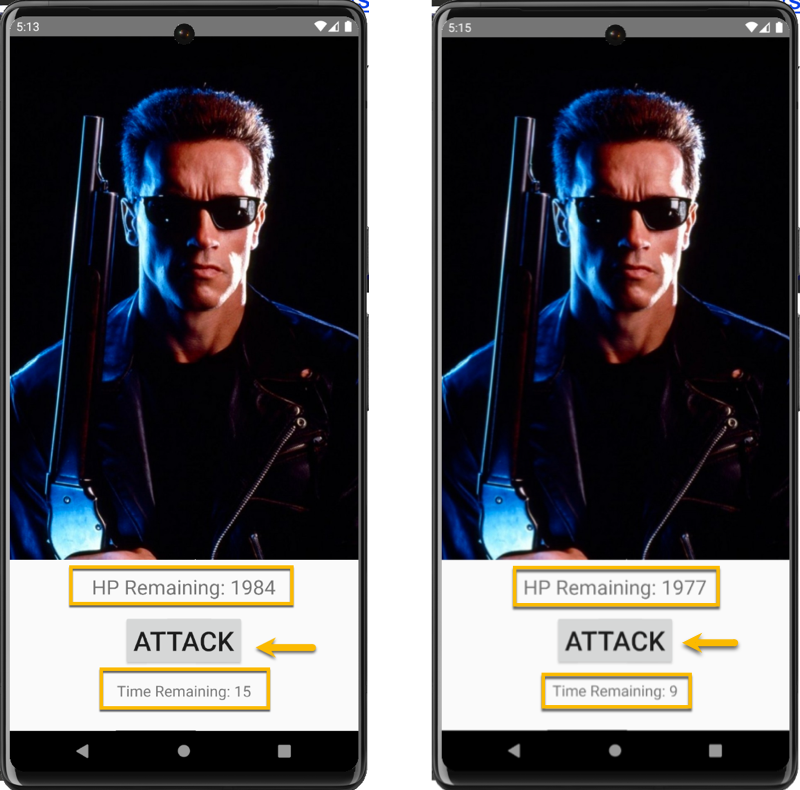
After seeing the application and running it, we can see that it starts out with HP Remaining: 1984 and a Time Remaining: 15 seconds. So for every click of the ATTACK button, we decrement the HP Remaining counter. So yes, you will get tendonitis of the pointy finger before you can wear down the clock.
It should be pretty obvious that we either 1) make the time counter so high that we can click 1984 times (which sounds absolutely awful), or 2) we set the "HP Remaining count so low that we can click within the alloted time (yes much better).
Approaching the Solution
There are a couple of ways that we can solve this challenge. One would be to use an interposing/hooking solution, such as Frida, to hook the respective class method and return the desired result.
The other, and the technique I chose, was to decompile the APK, modify the code to do the needful, and then repackage. As an aside, had the application code been obfuscated using something like ProGuard, we would have opted for the Frida route considering we would have been looking at functional memory and not source code.
Decompiling the APK
There are quite a few utilities that decompile APKs, but most all of them are using apktool to perform the heavy lifting. Note, on a Mac, you can just perform a brew install apktool to get it onto the system.

Aside from the AndroidManifest.xml, which should always be reviewed for things like exported items, is the smali directories. So the deal with Smali is that it is really just an intermediary language that provides a human readable version of the compiled bytecode. We can get back to Java source if we need to, but knowing how to read Smali is a valuable skill, in and of itself.
Analyzing the Source Code
Android applications typically leverage a reverse namespace convention such as com.example.gpterminator, which contains the application's primary functionality. With that, we have two directories of interest, smali and smali_classes2. The latter contains our namespace of interest and fortunately has very minimal functionality contained with the MainActivity.smali file.
Letting our eyes wash over the code, we can can see that there is a class constructor method (line 90) that returns void (i.e., .method public constructor ()V). There are also a couple of constants on lines 96 and 100. Imagine that, their hex to dec is 1984 and 15, which is the HP Remaining and Time Remaining values, respectively.
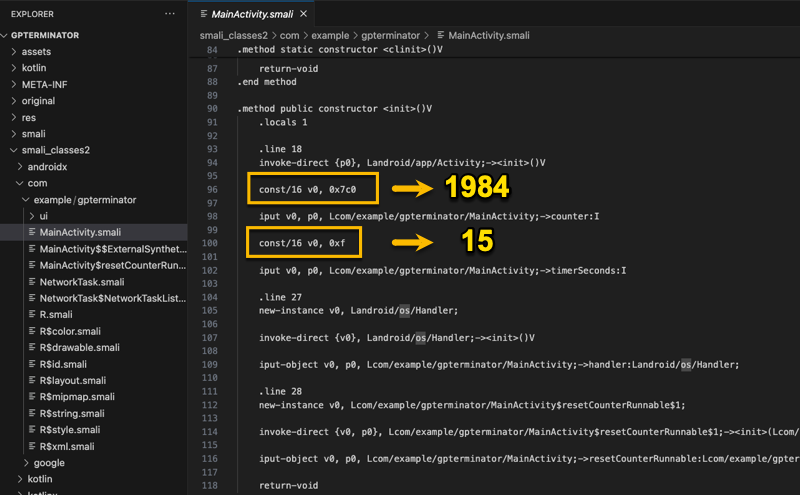
Ok so the logical thing to do is change 1984 to 1 (i.e., 0x1). I am not changing it to 0x0 because I need the satisfaction of at least one click of the ATTACK button!!!

As an aside, had the functionality been more complicated, I often use Frida to view the loaded classes, class methods and then watch anything that might be suspect or of interest. This helps to narrow in on the applicable source code when it comes time to trace the logic. Maybe more of this in a future blog post.
Recompiling the Code
The changes need to be recompiled which can also be done with apktool b <directory> -o modified.apk. At this point there might be a slight cleanup to AndroidManifest.xml due to a reference to an arbitrary non-existent debug resource, or similar. Easy enough to simply remove the troublesome statement from the Manifest and attempt to recompile again. I ran into this with the error: attribute android:dataExtractionRules not found.

Byte Aligning
After successfully recompiling the APK, we need to make sure the APK is byte aligned so that various uncompressed files are aligned relative to the start of the file image. Doing this is similar to any other alignment in that it makes memory management more performant.
To accomplish this, we use the zipalign utility provided within the Android Studio SDK (located within the build-tools directory). The command is zipalign -p 4 gpterm.apk gpterm-aligned.apk. Android Studio aligns to 4 bytes on both 32 and 64 bit archs, so we are directing zipalign to do the same here.
Code Signing the APK
Well we have made some modifications to the code and recompiled it, so it will need to be resigned in order to get it back onto an emulator or physical device. This is a two-step process 1) create a self-signed code signing certificate and 2) sign the APK.
Create the Code-Signing Certificate
To create the certificate pair, we use the keytool java utility. Use the following syntax:
keytool -genkey -v -keystore stackrelease.keystore -alias stackdroid-key -keyalg RSA -keysize 4096 -validity 10000
Sign the APK
Next, we will use the apksigner utility included as part of the Android Studio SDK. Use the following syntax:
apksigner sign --ks stackrelease.keystore --ks-key-alias stackdroid-key gpterm-aligned.apk
That's it. Now uninstall the old gpterminator.apk from the emulator and replace it with gpterm-aligned.apk. Launch and make sure it is functional.
Not Today, Arnold!
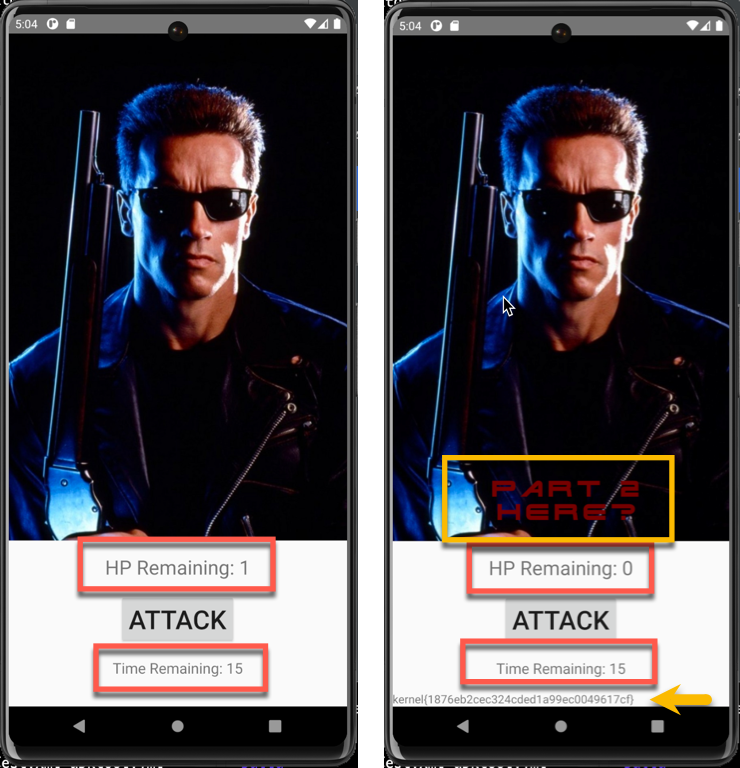
And now The Terminator isn't so tough! One click and no more SkyNet!!!! The lower right image provides the flag.
Conclusion
This was a fun exercise, and also demonstrates a technique that is useful when performing Android mobile security assessments. This is also my hope that it provides those that aren't too familiar with venturing into mobile penetration testing with the perspective that this discipline is completely accessible. Until next post, keep on hacking!