Sometimes, no better yet, almost every engagement we need to find different methods to deliver novel adversarial OpSec. This Saturday is no different. As I sit here rifling through Process Hacker memory dumps, I felt compelled to share yet another part of what I plan to stitch together into what I am hoping to become a nice attack that will slip into organizations with minimal effort.
Little known fact, or maybe it is a big known fact, but most anything that is attempting to establish a UNC call can fallback to a webdav request. I was talking with @ryhanson and he drops that little bit of knowledge on me as I am explaining, "but 445 may not be allowed outbound...". I stand corrected, so you know the rest of the conversation led into other aspects of what I was so intent on building. Additionally, as we were discussing OpSec, Ryan mentioned a couple of interesting considerations that I have included towards the end of this post.
For the time being let's just imagine that you, the adversary, have 1) control to influence how you make a UNC call but you would rather use TCP/443 as opposed to TCP/445, and 2) that you want to make it off-domain while providing some level of TLS confidentiality. The latter as a means to circumvent network egress technologies, such as packet inspection and the default let it out if we can't peer into it policy. Let's get started.
Establishing the EC2 Instance
First things first, we need to setup a Linux EC2 instance. This is pretty straight forward as it doesn't deviate from turning up any t2.micro instance. I'm not going to walk you through the whole process here because there are plenty of online resources, including AWS documentation, for getting started with AWS. However, I do want to show you what the dashboard should look like once you have an EC2 instance operational.

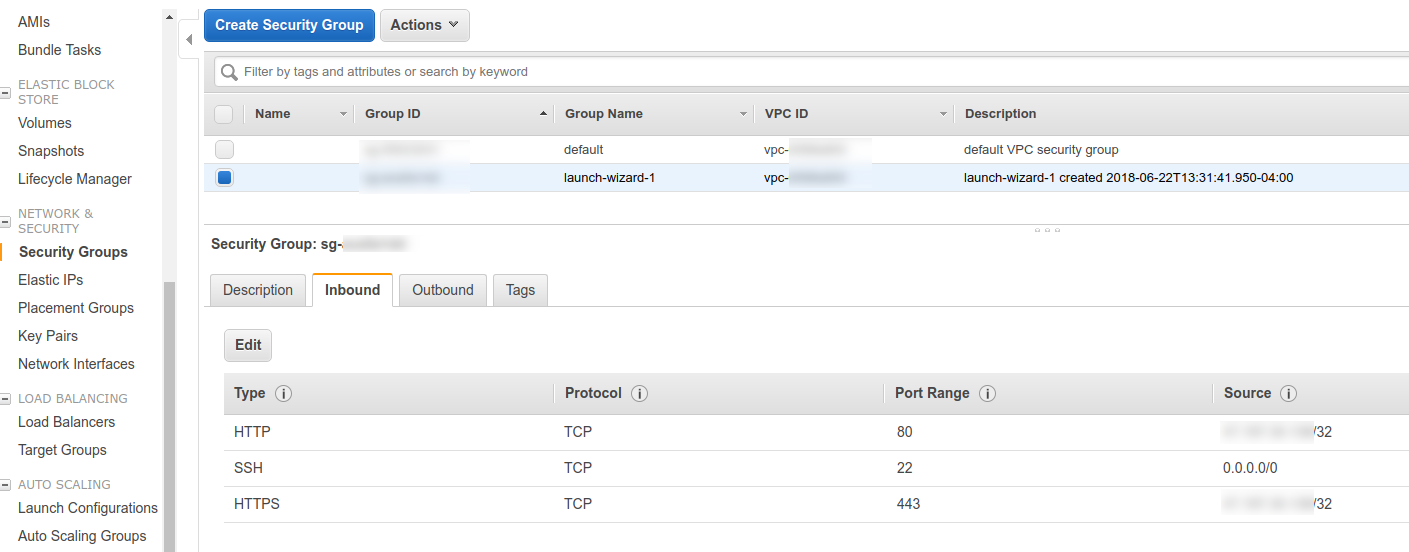
Note that one of the things that trips up people when they are setting up EC instances is the Security Group. For example, you might attempt to setup IPTables or even simply modify IPTables to only realize that they are either not installed or modification don't influence the access rules.
Happens to all of us. Head on over to the Security Groups tab and amend both the HTTP and HTTPS rules to allow whatever source you will be sending traffic from. This might be keyed to the organization's public network range in order to keep prying bots from crawling or other unwanted visitors from viewing our webdav contents. Also, the SSH rule is set to any source because we are doing key auth.
This should be enough progress so that we can install the real guts of the webdav server, so lets do that now.
Build out Apache / WebDav
SSH to the EC2 instance and install the Apache2 webserver:
sudo apt install apache2
Enable the relevant dav modules:
a2enmod dav
a2enmod dav_fs
You might want to verify that the Apache server is listening on the default TCP/80 port. We will change this later but for the time being you can check by typing line #1 and receiving a response similar to line #2:
#1 sudo netstat -antp |grep 80
#2 tcp 0 0 0.0.0.0:80  0.0.0.0:* LISTEN
Now we want to create our default Apache site. I am going to use paperscissorpwn.com as my site, but modify to fit your needs. Also this isn't really OpSec friendly. So, pick something that is more accommodating. As root do the following:
cd /etc/apache2/sites-available
cp 000-default.conf paperscissorpwn.com.conf
Now if we were to make our site active, it would be servicing a webpage under TCP/80. You can test this out by doing the following:
sudo a2ensite paperscissorpwn.com.conf
sudo service apache2 reload
Also, when we enabled our site, it created a path that should have looked like /var/www/paperscissorpwn.com. We need a place for our hosted webdav content to live, so let's do that now.
sudo mkdir -p /var/www/paperscissorpwn.com/webdav
Although this works, we ideally want our site to use the extended HTTP verbs that comprise webdav and also serve via TLS. We'll want to use a valid certificate to prevent blocked access and unnecessary warning messages. Enter certbot...
Let's Encrypt all the things
The magic of Let's Encrypt can be harnessed through the certbot utility. We also want to use the python certbot bindings specific to our Apache server. Install them using:
sudo add-apt-repository ppa:certbot/certbot
sudo apt-get install python-certbot-apache
Before we can use certbot, we need to modify our apache config.
cd /etc/apache2/sites-available/
sudo vim paperscissorpwn.com.conf
Now edit the file to include ServerName and ServerAlias. Again, modify for your specific domain.
<VirtualHost *:80>
    ServerName paperscissorpwn.com
    ServerAlias www.paperscissorpwn.com

    ErrorLog ${APACHE_LOG_DIR}/error.log
    CustomLog ${APACHE_LOG_DIR}/access.log combined
</VirtualHost>
Now enable the site and reload Apache to make the edits active. We need to do this so that our site is available when Let's Encrypt performs it's domain validation.
ProTip: If the validation fails, it is most likely due to the AWS Security Group policy being too restrictive. You may want to temporarily open this up to perform the validation, and then lock it down immediately after. Alternatively, you could lock it down to the external EC2 public IP source.
sudo a2ensite paperscissorpwn.com.conf
sudo service apache2 reload
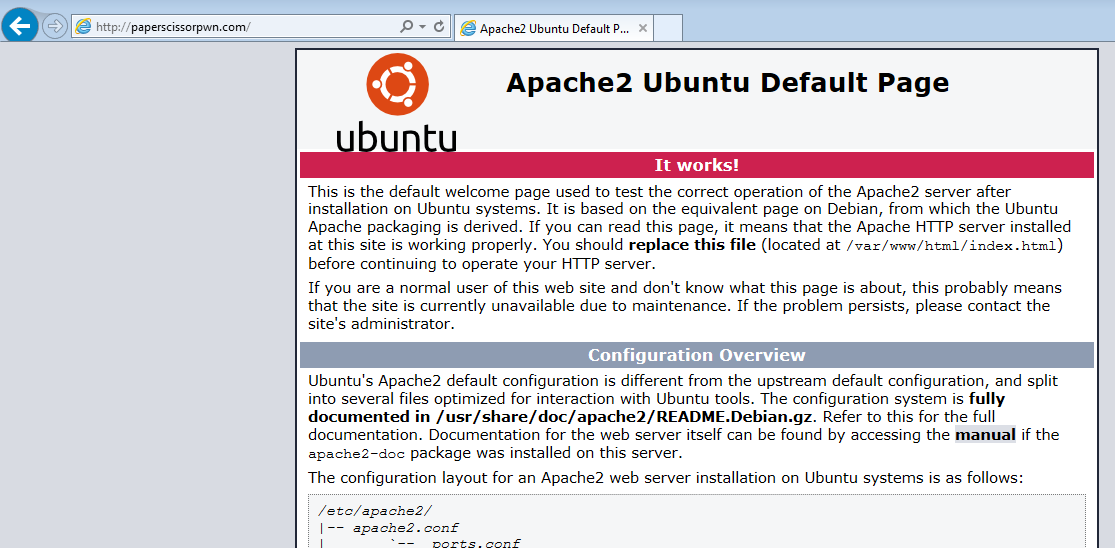
We should get the standard Apache2 default installation page.
At this point we can run certbot, which will do a few maintenance tasks for us.
- Generate valid certificates (obviously)
- Generate an Apache SSL config file
- Manage HTTP to HTTPS redirects
Running certbot should look similar to the following:
$ sudo certbot --apache -d paperscissorpwn.com -d www.paperscissorpwn.com
Saving debug log to /var/log/letsencrypt/letsencrypt.log
Plugins selected: Authenticator apache, Installer apache
Starting new HTTPS connection (1): acme-v01.api.letsencrypt.org
Obtaining a new certificate
Performing the following challenges:
tls-sni-01 challenge for paperscissorpwn.com
tls-sni-01 challenge for www.paperscissorpwn.com
Waiting for verification...
Cleaning up challenges
Created an SSL vhost at /etc/apache2/sites-available/paperscissorpwn.com-le-ssl.conf
Deploying Certificate to VirtualHost /etc/apache2/sites-available/paperscissorpwn.com-le-ssl.conf
Enabling available site: /etc/apache2/sites-available/paperscissorpwn.com-le-ssl.conf
Deploying Certificate to VirtualHost /etc/apache2/sites-available/paperscissorpwn.com-le-ssl.conf

Please choose whether or not to redirect HTTP traffic to HTTPS, removing HTTP access.
-------------------------------------------------------------------------------
1: No redirect - Make no further changes to the webserver configuration.
2: Redirect - Make all requests redirect to secure HTTPS access. Choose this for
new sites, or if you're confident your site works on HTTPS. You can undo this
change by editing your web server's configuration.
-------------------------------------------------------------------------------
Select the appropriate number [1-2] then [enter] (press 'c' to cancel): 2
Redirecting vhost in /etc/apache2/sites-enabled/paperscissorpwn.com.conf to ssl vhost in /etc/apache2/sites-available/paperscissorpwn.com-le-ssl.conf

-------------------------------------------------------------------------------
Congratulations! You have successfully enabled https://paperscissorpwn.com and
https://www.paperscissorpwn.com

You should test your configuration at:
https://www.ssllabs.com/ssltest/analyze.html?d=paperscissorpwn.com
https://www.ssllabs.com/ssltest/analyze.html?d=www.paperscissorpwn.com
-------------------------------------------------------------------------------
A couple of modifications have taken place up to this point. Notice that our paperscissorpwn.com.conf file used to serve HTTP requests now has a RewriteEngine enabled that rewrites all HTTP requests to HTTPS.
<VirtualHost *:80>
    ServerName paperscissorpwn.com
    ServerAlias www.paperscissorpwn.com

    ErrorLog ${APACHE_LOG_DIR}/error.log
    CustomLog ${APACHE_LOG_DIR}/access.log combined

RewriteEngine on
RewriteCond %{SERVER_NAME} =paperscissorpwn.com [OR]
RewriteCond %{SERVER_NAME} =www.paperscissorpwn.com
RewriteRule ^ https://%{SERVER_NAME}%{REQUEST_URI} [END,NE,R=permanent]
</VirtualHost>
Now take a look at the new file that was generated called paperscissorpwn.com-le-ssl.conf. This is our SSL enabled site containing the reference to our valid Let's Encrypt certificates. Nice!
<IfModule mod_ssl.c>
<VirtualHost *:443>
        ServerName paperscissorpwn.com
        ServerAlias www.paperscissorpwn.com

        ErrorLog ${APACHE_LOG_DIR}/error.log
        CustomLog ${APACHE_LOG_DIR}/access.log combined

Include /etc/letsencrypt/options-ssl-apache.conf
SSLCertificateFile /etc/letsencrypt/live/paperscissorpwn.com-0001/fullchain.pem
SSLCertificateKeyFile /etc/letsencrypt/live/paperscissorpwn.com-0001/privkey.pem
</VirtualHost>
</IfModule>
Finally, let's enable webdav by modifying this paperscissorpwn.com-le-ssl.conf file. Make sure the file looks like the following. Don't forget to add the SSLEngine on line, as well.
<IfModule mod_ssl.c>
<VirtualHost *:443>
        ServerName paperscissorpwn.com
        ServerAlias www.paperscissorpwn.com

        ErrorLog ${APACHE_LOG_DIR}/error.log
        CustomLog ${APACHE_LOG_DIR}/access.log combined

        Alias /webdav /var/www/paperscissorpwn.com/webdav

        <Location /webdav>
                Options Indexes
                DAV On
                <LimitExcept GET HEAD OPTIONS PROPFIND>
                        Deny from all
                </LimitExcept>
                Satisfy all
        </Location>

SSLEngine on

Include /etc/letsencrypt/options-ssl-apache.conf
SSLCertificateFile /etc/letsencrypt/live/paperscissorpwn.com-0001/fullchain.pem
SSLCertificateKeyFile /etc/letsencrypt/live/paperscissorpwn.com-0001/privkey.pem
</VirtualHost>
</IfModule>
Again, reload Apache to make sure all changes take affect. Rule of thumb, reload anytime you modify your Apache config files.
sudo service apache2 reload
Test our Access
We have finally reached the point that we can test all of our hard work. Let's point a browser at http://paperscissorpwn.com/webdav and see what happens. Note that I have files already in my /var/www/paperscissorpwn.com/webdav directory, but this is the path that you are going to use to serve whatever file/payload you so desire.
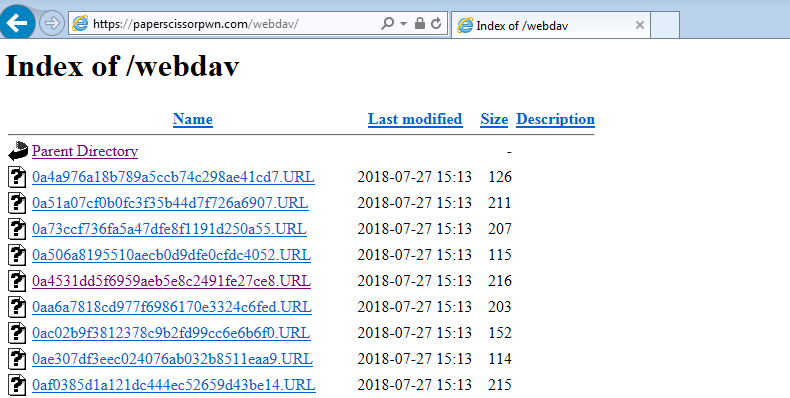
Notice that our HTTP request was actually served on HTTPS, and we didn't get a certificate error! One last thing to do, and that is to test the replacement of a UNC path with a webdav path. The easiest way to demonstrate this is with Windows file explore.
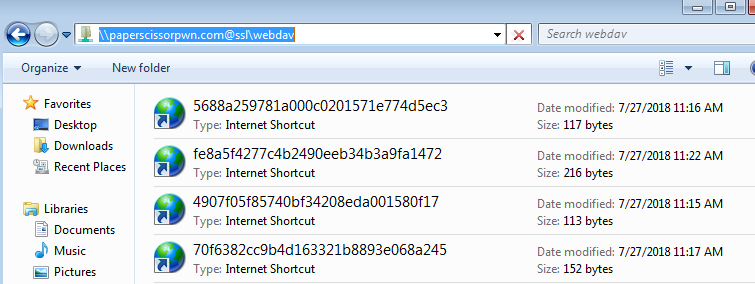
Note the composition of the path paperscissorpwn.com@ssl. The @ssl is the literal method to invoke a secure webdav request. Again, notice we have no certificate errors.
OpSec Consideration #1 - Domain Reputation
It should go without stating, but i will state the following again. If you are in a hostile environment, and all network environments are hostile, profile the expected network traffic and adapt. If the environment is a financial organization then search for a recently expired domain name that is still categorized as fiserv and still maintains a positive reputation. The little extra effort might just allow you to escape the network.
What else, since this is a post about webdav, I attempted to domain-front via AWS' CloudFront, but webdav requires an extended HTTP Verb set that is not quite yet supported. However, I admittedly have not reviewed other cloud providers to see if they might. If you venture down this rabbithole, let me know as I am curious.
OpSec Consideration #2 - Directory Indexing
Consider the fact that our solution is currently providing directory indexing, and that isn't really something that is OpSec safe. We can fix that by dropping an index.html page in our web root directory. If you were following along then it should be placed within /var/www/paperscissorpwn.com/webdav. The following will add a blank page, whereas anything attempting to access our webdav content would require prior knowledge of the file and respective absolute path.
cd /var/www/paperscissorpwn.com/webdav/
sudo touch index.html
OpSec Consideration #3 - M$ Office Filtering
The last item that I want to mention is filtering. Specifically, consider that we want to prevent just anyone or anything from accessing our hosted webdav content. The fact that our attack is intended for M$ Windows and more importantly delivered via an Office suite of products, then we should ensure that those targets are the only entities placing the call for our webdav hosted payload. The method we will investigate is filtering on a User-Agent string as a gatekeeper to determine webdav access.
First, we need to know what our webdav User-Agent string should look like so that we can apply the appropriate filters. The Apache logs will give us this information.
sudo tail -f /var/log/apache2/
47.197.30.138 - - [28/Jul/2018:21:58:39 +0000] "PROPFIND /webdav/ehuihlp.dll HTTP/1.1" 207 1339 "-" "Microsoft-WebDAV-MiniRedir/6.1.7601"
47.197.30.138 - - [28/Jul/2018:21:58:39 +0000] "PROPFIND /webdav/ehuihlp.dll HTTP/1.1" 207 1194 "-" "Microsoft-WebDAV-MiniRedir/6.1.7601"
47.197.30.138 - - [28/Jul/2018:21:58:39 +0000] "PROPFIND /webdav/ehuihlp.dll HTTP/1.1" 207 1194 "-" "Microsoft-WebDAV-MiniRedir/6.1.7601"
Note that the User-Agent is Microsoft-WebDAV-MiniRedir/6.1.7601. There are multiple methods to filter on arbitrary values (e.g., User-Agent). For example, we could implement a reverse proxy that uses a middleware chain to determine authorization, or we could create an htaccess file to be applied on an Apache web directory. Both would work, but a better method would be to use the Apache mod_rewrite module.
The mod_rewrite module is actually a proxy that is used to essentially perform PCRE regex matching and has some rather powerful flexibility. For our particular use case, we are going to patch our Apache SSL config file to prevent anything but our intended User-Agent string.
cd /etc/apache2/sites-available/
sudo vim paperscissorpwn.com-le-ssl.conf
Now we need to edit the file by adding line #1, line #2, and line #3.
<IfModule mod_ssl.c>
<VirtualHost *:443>
        ServerName paperscissorpwn.com
        ServerAlias www.paperscissorpwn.com

        ErrorLog ${APACHE_LOG_DIR}/error.log
        CustomLog ${APACHE_LOG_DIR}/access.log combined

        Alias /webdav /var/www/paperscissorpwn.com/webdav

        <Location /webdav>
                Options Indexes
                DAV On
                <LimitExcept GET HEAD OPTIONS PROPFIND>
                        Deny from all
                </LimitExcept>
                Satisfy all
        </Location>


#1 RewriteEngine on
#2 RewriteCond %{HTTP_USER_AGENT} !(Microsoft-WebDAV-MiniRedir/6.1.7601)
#3 RewriteRule .* - [F,L]

SSLEngine on

Include /etc/letsencrypt/options-ssl-apache.conf
SSLCertificateFile /etc/letsencrypt/live/paperscissorpwn.com-0001/fullchain.pem
SSLCertificateKeyFile /etc/letsencrypt/live/paperscissorpwn.com-0001/privkey.pem
</VirtualHost>
</IfModule>
The line #1 simply turns on the mod-rewrite engine. Next, line #2 matches on a User-Agent string and checks if it IS NOT our intended string. Lastly, line #3 states that if the User-Agent was not our intended string then return a Forbidden response and prevent further access. Again, make sure you reload the apache config for the changes to take affect.
sudo service apache2 reload
Conclusion
This post was actually longer than I anticipated as there were some items that I wanted to elaborate on. To summarize, we have successfully created an AWS EC2 instance, enabled webdav, and applied valid certificates with Let's Encrypt. To wrap things up, we explored a few operational security techniques that can both help to get the traffic out of network, as well as prevent unwanted access to our webdav content.
This solution has a lot of potential, and can help to slip out of networks when other http/https traffic may not. How you use it is up to you, but more than interested to know how you do so. Always forward.